Welcome
Create and manage your GARAN labels here.
Quick access
Selling on Shopify?
Our Shopify app creates the GARAN labels itself, shows them on the product page and provides a block for the order confirmation.
Recently created
Show all| Brand | Model | Years | Created | Download |
|---|
Your first label is ready in a minute.
Create labelPreview
Example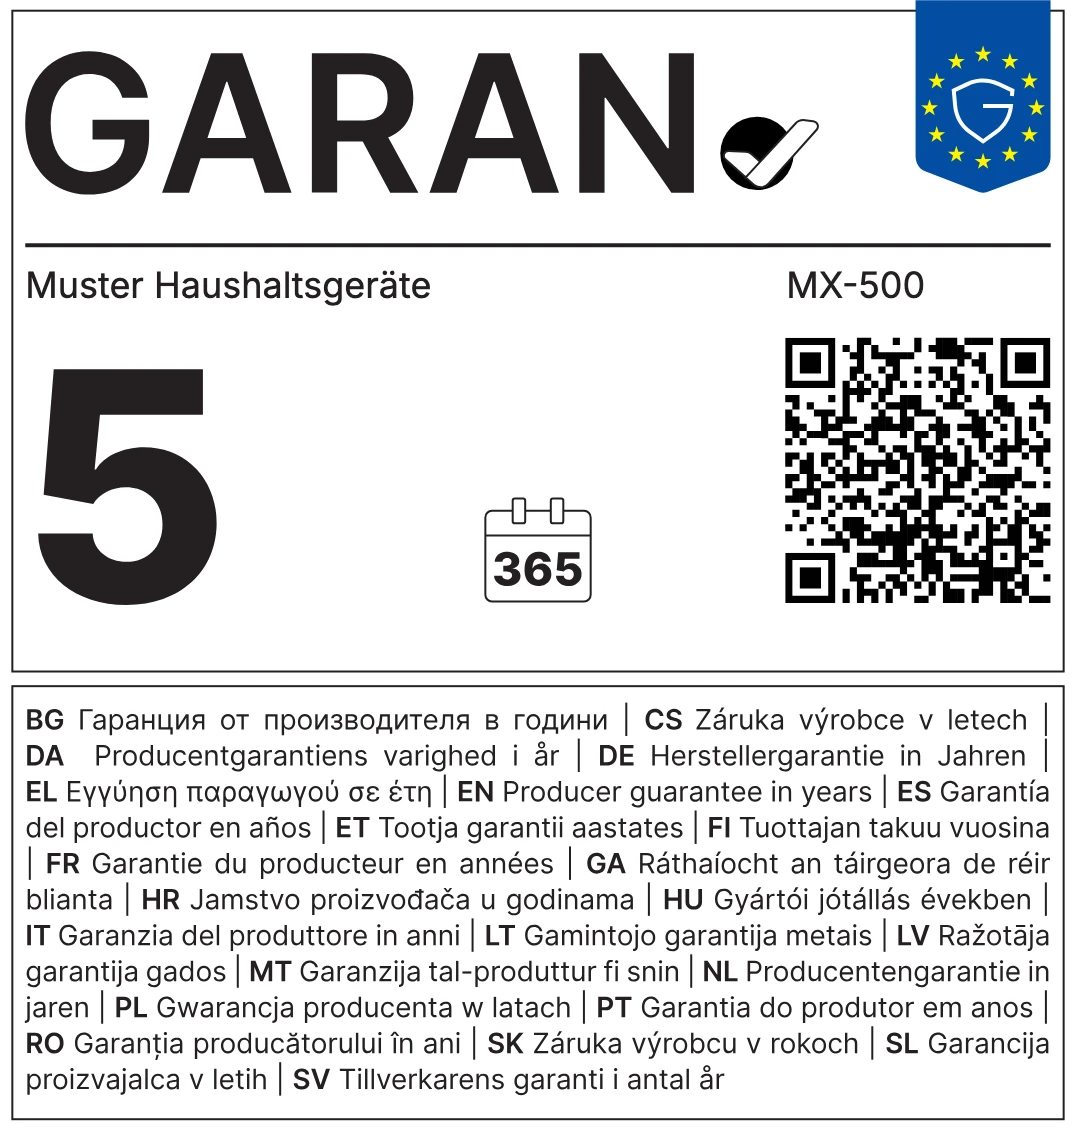

Many labels at once
Download sample CSVThe file is only read in your browser and is not uploaded. Only brand, model and years are sent to our server, checked row by row. Labels you have already created cost nothing.
| Row | Brand | Model | Years | Check |
|---|
Result: one ZIP with all labels, each full and nested, as SVG and PNG.
| Label | Brand | Model | Years | Created | Statement | Download |
|---|
Create a label one by one or by CSV.
Create label1. Your shop system
Legal guarantee notice free of chargeFor Shopify, there is our app
It shows the legal guarantee notice and the GARAN label on the product page automatically, without code, and provides a block that adds both, including the guarantee statement, to the order confirmation. Installed in a few minutes, 7 days free.
Afterwards, you can check below whether the labels appear on your product page.
How to do it in WooCommerce
Detailed guide- Open the templateIn WordPress, go to Appearance → Editor → Templates and open “Single Product”. With a classic theme, skip to step 4.
- Insert a blockBelow the “Add to Cart with Options” block, insert a “Custom HTML” block.
- Paste the codePaste the widget code and save the template. It then applies to all product pages.
- Classic themeWithout the block editor, output the code in your child theme via the hook
woocommerce_single_product_summarywith priority 35, or use a snippet plugin.
Widget code for the legal guarantee notice
<div data-garantielabel></div>
<script src="https://www.garantielabel.app/widget.js" async></script>
Show the GARAN label in the widget for producer guarantees over 2 years
Under “My labels”, download the full and the nested version as SVG, upload both to your shop’s media library and enter their addresses. The widget shows the nested version; a click opens the full one.
<div data-garantielabel
  data-garan-voll="https://…/GARAN-Brand-Model.svg"
  data-garan-klein="https://…/GARAN-Brand-Model-nested.svg"></div>
<script src="https://www.garantielabel.app/widget.js" async></script>
How to do it in Shopware 6
Detailed guide- Open the Shopping ExperienceIn the Administration, go to Content → Shopping Experiences and open the layout of your product pages, or create a new one of the type “Product page”.
- Insert the placeholderBelow the buy box, add a block with a text element, switch to the source code view and insert
<div data-garantielabel></div>. - Load the scriptAdd the line with
widget.jsvia the theme (for example inbase.html.twig) or via a plugin for custom scripts, then save the layout and assign it to the products. - Alternative in the themeDevelopers extend the buy box template (
buy-widget.html.twig) in their own theme with the placeholder and load the script in the template head.
Widget code for the legal guarantee notice
<div data-garantielabel></div>
<script src="https://www.garantielabel.app/widget.js" async></script>
Show the GARAN label in the widget for producer guarantees over 2 years
Under “My labels”, download the full and the nested version as SVG, upload both to your shop’s media library and enter their addresses. The widget shows the nested version; a click opens the full one.
<div data-garantielabel
  data-garan-voll="https://…/GARAN-Brand-Model.svg"
  data-garan-klein="https://…/GARAN-Brand-Model-nested.svg"></div>
<script src="https://www.garantielabel.app/widget.js" async></script>
How to do it in Wix
Detailed guide- Open the product pageIn the Wix Editor, open the Wix Stores product page. Changes there apply to all products.
- Add the elementGo to “Add Elements” → “Embed Code” and choose the “Embed HTML” element.
- Paste the codePaste the widget code, drag the element below the add-to-cart button and make it large enough for the whole graphic to be visible.
- PublishPublish the site and check a product page.
Widget code for the legal guarantee notice
<div data-garantielabel data-darstellung="voll" data-sprache="en"></div>
<script src="https://www.garantielabel.app/widget.js" async></script>
Show the GARAN label in the widget for producer guarantees over 2 years
Under “My labels”, download the full and the nested version as SVG, upload both to your shop’s media library and enter their addresses. The widget shows the nested version; a click opens the full one.
<div data-garantielabel
  data-garan-voll="https://…/GARAN-Brand-Model.svg"
  data-garan-klein="https://…/GARAN-Brand-Model-nested.svg"></div>
<script src="https://www.garantielabel.app/widget.js" async></script>
How to do it in Webflow
Detailed guide- Open the product templateIn the Designer, open the “Products Template” under Pages.
- Add a Code EmbedDrag the “Code Embed” element from the Add panel below the Add to Cart button.
- Paste the codePaste the widget code and save.
- PublishPublish the site. Embedded scripts do not run in the Designer itself.
Widget code for the legal guarantee notice
<div data-garantielabel></div>
<script src="https://www.garantielabel.app/widget.js" async></script>
Show the GARAN label in the widget for producer guarantees over 2 years
Under “My labels”, download the full and the nested version as SVG, upload both to your shop’s media library and enter their addresses. The widget shows the nested version; a click opens the full one.
<div data-garantielabel
  data-garan-voll="https://…/GARAN-Brand-Model.svg"
  data-garan-klein="https://…/GARAN-Brand-Model-nested.svg"></div>
<script src="https://www.garantielabel.app/widget.js" async></script>
How to do it in JTL-Shop
Detailed guide- Use a child templateChanges belong in a child template (for NOVA: NOVAChild) so that updates do not overwrite them.
- Extend the templateIn the child template, extend the template of the item detail page and place the widget code below the add-to-basket button. It then applies to all items.
- Single itemFor one item only: in the OnPage Composer, drag a text portlet below the add-to-basket button and paste the code in source code view. The OnPage Composer edits each page separately.
- CheckClear the cache or publish the draft and check an item.
Widget code for the legal guarantee notice
<div data-garantielabel></div>
<script src="https://www.garantielabel.app/widget.js" async></script>
Show the GARAN label in the widget for producer guarantees over 2 years
Under “My labels”, download the full and the nested version as SVG, upload both to your shop’s media library and enter their addresses. The widget shows the nested version; a click opens the full one.
<div data-garantielabel
  data-garan-voll="https://…/GARAN-Brand-Model.svg"
  data-garan-klein="https://…/GARAN-Brand-Model-nested.svg"></div>
<script src="https://www.garantielabel.app/widget.js" async></script>
How to do it in Squarespace
Detailed guide- Open the productEdit the product in Commerce or on the store page.
- Add a code blockAdd a code block in the additional information section.
- Paste the codePaste the widget code, leave “Display Source” switched off and save.
- Load the script centrallyYou can also load the line with
widget.jsonce via the store page’s Code Injection. The placeholder still has to be in every product.
Widget code for the legal guarantee notice
<div data-garantielabel data-darstellung="voll"></div>
<script src="https://www.garantielabel.app/widget.js" async></script>
Show the GARAN label in the widget for producer guarantees over 2 years
Under “My labels”, download the full and the nested version as SVG, upload both to your shop’s media library and enter their addresses. The widget shows the nested version; a click opens the full one.
<div data-garantielabel
  data-garan-voll="https://…/GARAN-Brand-Model.svg"
  data-garan-klein="https://…/GARAN-Brand-Model-nested.svg"></div>
<script src="https://www.garantielabel.app/widget.js" async></script>
How to do it in Magento / Adobe Commerce
Detailed guide- Create a CMS blockUnder Content → Blocks, create a new block and paste the widget code. From version 2.4.3, Page Builder opens; use the “HTML Code” element there.
- Create a widgetUnder Content → Elements → Widgets, create a widget of the type “CMS Static Block” for your theme.
- Place itAs the layout update, choose “All Product Types” and select the container “Product View Extra Hint”. It sits below the add-to-cart button.
- Flush the cacheSave, flush the cache and check a product page.
Widget code for the legal guarantee notice
<div data-garantielabel></div>
<script src="https://www.garantielabel.app/widget.js" async></script>
Show the GARAN label in the widget for producer guarantees over 2 years
Under “My labels”, download the full and the nested version as SVG, upload both to your shop’s media library and enter their addresses. The widget shows the nested version; a click opens the full one.
<div data-garantielabel
  data-garan-voll="https://…/GARAN-Brand-Model.svg"
  data-garan-klein="https://…/GARAN-Brand-Model-nested.svg"></div>
<script src="https://www.garantielabel.app/widget.js" async></script>
How to do it in Gambio
Detailed guide- Check your versionFrom Gambio 26.09.0, you switch on both labels in the shop settings, per customer group if you wish. For older versions from 4.6, Gambio says there is a module. In that case you do not need the widget.
- Add the scriptFor the widget, go to „Einstellungen“ → „Suchmaschinenoptimierung“ → „Tracking-Codes“ (Settings → Search engine optimisation → Tracking codes) and insert the line with
widget.jsin the „Body“ section. It is then loaded on all shop pages. - Set the placeholderIn the item description, open the source code view in the editor and insert the placeholder
<div data-garantielabel></div>where you want it. - CheckAfter saving, open the source code view again. If the placeholder is still there, the label appears on the product page.
Widget code for the legal guarantee notice
<div data-garantielabel></div>
<script src="https://www.garantielabel.app/widget.js" async></script>
Show the GARAN label in the widget for producer guarantees over 2 years
Under “My labels”, download the full and the nested version as SVG, upload both to your shop’s media library and enter their addresses. The widget shows the nested version; a click opens the full one.
<div data-garantielabel
  data-garan-voll="https://…/GARAN-Brand-Model.svg"
  data-garan-klein="https://…/GARAN-Brand-Model-nested.svg"></div>
<script src="https://www.garantielabel.app/widget.js" async></script>
How to do it in PrestaShop
Detailed guide- Use a child themeTheme changes belong in a child theme so that updates do not overwrite them.
- Choose the spotIn
templates/catalog/product.tpl, find the area below the add-to-cart button. - Paste the codePaste the widget code there. Alternatively, use an HTML block module from the Addons marketplace at the hook
displayProductAdditionalInfo. - Clear the cacheClear the cache under Advanced Parameters → Performance and check.
Widget code for the legal guarantee notice
<div data-garantielabel></div>
<script src="https://www.garantielabel.app/widget.js" async></script>
Show the GARAN label in the widget for producer guarantees over 2 years
Under “My labels”, download the full and the nested version as SVG, upload both to your shop’s media library and enter their addresses. The widget shows the nested version; a click opens the full one.
<div data-garantielabel
  data-garan-voll="https://…/GARAN-Brand-Model.svg"
  data-garan-klein="https://…/GARAN-Brand-Model-nested.svg"></div>
<script src="https://www.garantielabel.app/widget.js" async></script>
How to do it in OXID eShop
Detailed guide- Module or child themeThe extension belongs in a small module or a child theme (in
theme.phpwith'parentTheme' => 'apex') so that updates of the APEX theme do not overwrite it. You activate it under Extensions → Modules or Extensions → Themes. You need file access for this; usually your agency takes care of it. - Extend the blockExtend the template
page/details/inc/productmain.html.twigand paste the widget code in the blockdetails_productmain_tobasketafter{{ parent() }}. Withparent(), the add-to-basket button stays unchanged. - GARAN label per productFor your own GARAN labels, create two attributes under Administer Products → Attributes, for example “GARAN full” and “GARAN small”, and enter the addresses of the two files on the product under Selection → Assign Attributes. In the template, output the values in
data-garan-vollanddata-garan-klein. - Clear the cacheClear the template cache with
vendor/bin/oe-console oe:cache:clearand check the product page, including variants.
Widget code for the legal guarantee notice
<div data-garantielabel></div>
<script src="https://www.garantielabel.app/widget.js" async></script>
Show the GARAN label in the widget for producer guarantees over 2 years
Under “My labels”, download the full and the nested version as SVG, upload both to your shop’s media library and enter their addresses. The widget shows the nested version; a click opens the full one.
<div data-garantielabel
  data-garan-voll="https://…/GARAN-Brand-Model.svg"
  data-garan-klein="https://…/GARAN-Brand-Model-nested.svg"></div>
<script src="https://www.garantielabel.app/widget.js" async></script>
How to do it in plentyONE
Detailed guide- Check your versionFrom plentyShop LTS 5.0.83, ShopBuilder offers the widgets “Guarantee of conformity” and “Guarantee of durability”. The “Guarantee of durability” widget shows the GARAN label if the manufacturer, the model and the commercial guarantee of durability are maintained for the item.
- Open ShopBuilderUnder Shop » ShopBuilder, open the content for the single item page (content type Item).
- Insert the Code widgetFor the notice directly on the item page, drag the “Code” widget below the “Add to basket” widget and paste the code from above, with
<script2>instead of<script>. - Save and checkSave and check the item page in the live shop, also when switching variations. After plentyShop updates, regenerate the contents under Shop » ShopBuilder.
Widget code for the legal guarantee notice
<div data-garantielabel></div>
<script2 src="https://www.garantielabel.app/widget.js" async></script2>
Show the GARAN label in the widget for producer guarantees over 2 years
Under “My labels”, download the full and the nested version as SVG, upload both to your shop’s media library and enter their addresses. The widget shows the nested version; a click opens the full one.
<div data-garantielabel
  data-garan-voll="https://…/GARAN-Brand-Model.svg"
  data-garan-klein="https://…/GARAN-Brand-Model-nested.svg"></div>
<script src="https://www.garantielabel.app/widget.js" async></script>
How to do it in ePages
Detailed guide- Check your versionThese steps apply to ePages Base, the older version. If you have ePages Now, use the built-in features above.
- Add the scriptUnder „Einstellungen“ → „Allgemeine Einstellungen“ → „Erweiterte Einstellungen“ (Settings → General settings → Advanced settings), insert the line with
widget.jsin the field „HTML-Head-Bereich“ (HTML head area) and save. It then applies to all pages. - Placeholder in the productUnder „Produkte“ → „Produkte“ (Products → Products), open the item, insert the placeholder
<div data-garantielabel></div>in the „Erweiterte Beschreibung“ (extended description) via „Quellcode“ (source code), apply and save. - CheckRefresh the page cache via „Ihre Seite anzeigen“ (view your site) and check the product page. Then open the source code view again: if the placeholder is still there, the editor has not removed it.
Widget code for the legal guarantee notice
<div data-garantielabel></div>
<script src="https://www.garantielabel.app/widget.js" async></script>
Show the GARAN label in the widget for producer guarantees over 2 years
Under “My labels”, download the full and the nested version as SVG, upload both to your shop’s media library and enter their addresses. The widget shows the nested version; a click opens the full one.
<div data-garantielabel
  data-garan-voll="https://…/GARAN-Brand-Model.svg"
  data-garan-klein="https://…/GARAN-Brand-Model-nested.svg"></div>
<script src="https://www.garantielabel.app/widget.js" async></script>
How to do it in Jimdo
Detailed guide- Creator or Website Builder?If the editor’s address starts with cms.e.jimdo.com, you are using Jimdo Creator. In the Website Builder (builder.e.jimdo.com), you cannot add custom code.
- Add the elementOn the product’s page, below the store item, choose “Add Element” → “More elements and Add-ons” → “Widget/HTML”.
- Paste the codePaste the widget code, for a GARAN label with the addresses in
data-garan-vollanddata-garan-klein, and save. - Load the script centrallyIf you like, add the line with
widget.jsonce under Menu → Settings → “Edit Head”. Then each product’s element only needs the placeholder.
Widget code for the legal guarantee notice
<div data-garantielabel></div>
<script src="https://www.garantielabel.app/widget.js" async></script>
Show the GARAN label in the widget for producer guarantees over 2 years
Under “My labels”, download the full and the nested version as SVG, upload both to your shop’s media library and enter their addresses. The widget shows the nested version; a click opens the full one.
<div data-garantielabel
  data-garan-voll="https://…/GARAN-Brand-Model.svg"
  data-garan-klein="https://…/GARAN-Brand-Model-nested.svg"></div>
<script src="https://www.garantielabel.app/widget.js" async></script>
In any other system
Detailed guide- PlaceholderPlace the code on the product page directly below the buy area. The label appears exactly there.
- Save and publishThen reload the product page and check below.
Widget code for the legal guarantee notice
<div data-garantielabel></div>
<script src="https://www.garantielabel.app/widget.js" async></script>
Show the GARAN label in the widget for producer guarantees over 2 years
Under “My labels”, download the full and the nested version as SVG, upload both to your shop’s media library and enter their addresses. The widget shows the nested version; a click opens the full one.
<div data-garantielabel
  data-garan-voll="https://…/GARAN-Brand-Model.svg"
  data-garan-klein="https://…/GARAN-Brand-Model-nested.svg"></div>
<script src="https://www.garantielabel.app/widget.js" async></script>
2. Check that it worked
Enter the address of a product page. We load the page once and check whether the legal guarantee notice and the GARAN label are embedded there.
Buy credits
No subscription · never expires| Labels | Net price | Per label |
|---|---|---|
| €4.90 | €0.49 | |
| €17.90 | €0.179 −63 % | |
| €44.00 | €0.088 −82 % | |
| €129.00 | €0.065 −87 % | |
| €490.00 | €0.049 −90 % |
Your selection
500 labels€44.00
Net plus VAT. The invoice from MMR Labs GmbH showing VAT is sent by Stripe by e-mail and is listed below under your purchases. You can enter your VAT ID during checkout. Refunds
Card payment is currently being activated by Stripe. You will be able to buy credits shortly. Your first three GARAN labels are already free.


Purchases and invoices
| Date | Package | Net amount | Status | Invoice |
|---|
Your purchases and invoices appear here.
API key
With the key, your shop system, PIM or ERP fetches GARAN labels directly. Each new label costs one credit from this account.
Example
Documentationcurl -X POST https://www.garantielabel.app/api/v1/labels \
-H "Authorization: Bearer gl_…" \
-H "Accept: image/svg+xml" \
-H "Content-Type: application/json" \
-d '{"jahre":"5","marke":"Muster","modell":"MX-500"}' \
-o GARAN-MX-500.svgResponse: the finished SVG. Fetching the same details again costs no credit. The balance is in the header X-Guthaben.
How approval works
- We check every entry by hand before it goes public.
- Only labels of your own brand become public. We enable further brands on request.
- You can delete the entry at any time. Your labels in the account remain.